Making a sterling silver ring by hand is more achievable than it looks. The process involves a handful of basic metalworking techniques — cutting, shaping, soldering, filing, and polishing — each of which can be learned in a single session. This guide walks through every step, from raw silver wire to a finished ring.การทำแหวนเงินสเตอร์ลิงด้วยมือทำได้ง่ายกว่าที่คิด กระบวนการประกอบด้วยเทคนิคการทำงานโลหะพื้นฐานไม่กี่อย่าง ได้แก่ การตัด ขึ้นรูป บัดกรี ตะไบ และขัดเงา ซึ่งแต่ละอย่างเรียนรู้ได้ในเซสชั่นเดียว คู่มือนี้จะพาคุณผ่านทุกขั้นตอน ตั้งแต่ลวดเงินดิบไปจนถึงแหวนสำเร็จ
What You’ll Needสิ่งที่ต้องใช้
- 925 sterling silver wire or sheetลวดหรือแผ่นเงิน 925 สเตอร์ลิง — for a basic band, 1–2 mm round wire works wellสำหรับแถบพื้นฐาน ลวดกลมขนาด 1–2 มม. ใช้ได้ดี
- Ring mandrelแมนเดรลแหวน — a tapered steel rod for shaping and sizingแท่งเหล็กทรงกรวยสำหรับขึ้นรูปและวัดขนาด
- Round-nose and flat-nose pliersคีมปากกลมและคีมปากแบน
- Jeweller’s saw or flush cuttersเลื่อยช่างทองหรือคีมตัดตรง
- Easy silver solder and fluxบัดกรีเงินและฟลักซ์
- Small torchไฟฉาย (ทอร์ช) ขนาดเล็ก — butane jewellery torches work for thin wire ringsทอร์ชบิวเทนสำหรับงานทองเหมาะกับแหวนลวดบาง
- Pickle solutionน้ำยาพิเคิล — to clean fire scale after soldering (citric acid works well)สำหรับทำความสะอาดคราบไฟหลังบัดกรี (กรดซิตริกใช้ได้ดี)
- Half-round and flat filesตะไบครึ่งวงกลมและตะไบแบน
- Polishing papers (400–1200 grit) and a polishing clothกระดาษขัดเงา (เกรด 400–1200) และผ้าขัด
Step 1 — Measure and Cut the Silverขั้นตอนที่ 1 — วัดขนาดและตัดเงิน
Find your ring size using a ring mandrel — slide a ring that fits onto the mandrel and note the number at the bottom of the ring. Now measure the circumference at that point: this is the length of silver you need to cut (add 1 mm for the solder join). Cut the wire cleanly and as squarely as possible.หาขนาดแหวนของคุณโดยใช้แมนเดรล สวมแหวนที่พอดีลงบนแมนเดรลและจดตัวเลขที่ขอบล่างของแหวน จากนั้นวัดเส้นรอบวงที่จุดนั้น นี่คือความยาวเงินที่ต้องตัด (บวกอีก 1 มม. สำหรับรอยบัดกรี) ตัดลวดให้สะอาดและตั้งฉากที่สุด
Step 2 — Shape Into a Ringขั้นตอนที่ 2 — ขึ้นรูปเป็นวง
Bend the wire around the mandrel using your fingers and pliers, working gradually around the curve. The two ends should meet flush with no gap or overlap. If they don’t meet perfectly, file them until they do — a tight, flush join is critical for solder to flow properly. Check on the mandrel that the ring is round.ดัดลวดรอบแมนเดรลโดยใช้นิ้วและคีม ค่อยๆ ดัดรอบเส้นโค้ง ปลายทั้งสองควรพบกันพอดีโดยไม่มีช่องว่างหรือซ้อนกัน ถ้าไม่พบกันพอดี ให้ตะไบจนสนิท รอยต่อที่แน่นและชนกันพอดีสำคัญมากสำหรับการไหลของบัดกรี ตรวจสอบบนแมนเดรลว่าแหวนกลม
Step 3 — Solder the Joinขั้นตอนที่ 3 — บัดกรีรอยต่อ
Apply flux to the join. Place a small chip of easy silver solder directly on the seam. Heat the whole ring gently with your torch — heat the silver, not the solder. When the ring reaches soldering temperature, the solder will melt and be drawn into the seam by capillary action. Remove the heat immediately when you see it flow. Do not overheat.ทาฟลักซ์ที่รอยต่อ วางชิ้นบัดกรีเงิน easy ขนาดเล็กตรงรอยต่อ อุ่นแหวนทั้งวงด้วยทอร์ชอย่างนุ่มนวล อุ่นเงิน ไม่ใช่บัดกรี เมื่อแหวนถึงอุณหภูมิบัดกรี บัดกรีจะละลายและถูกดูดเข้ารอยต่อด้วยแรงดูดซึม ดึงความร้อนออกทันทีเมื่อเห็นมันไหล อย่าให้ร้อนเกิน
Step 4 — Pickle and Rinseขั้นตอนที่ 4 — แช่พิเคิลและล้าง
Drop the ring into your pickle solution (warm citric acid works) and leave for a few minutes. The pickle removes fire scale — the dark oxidation left by the torch. Rinse thoroughly in clean water before filing. Never put steel tools into pickle; always use plastic or copper tongs.วางแหวนในน้ำยาพิเคิล (กรดซิตริกอุ่นใช้ได้ดี) ทิ้งไว้สักครู่ พิเคิลจะขจัดคราบไฟ ออกซิเดชั่นสีเข้มที่ทอร์ชทิ้งไว้ ล้างให้สะอาดด้วยน้ำสะอาดก่อนตะไบ ห้ามใส่เครื่องมือเหล็กในพิเคิล ใช้คีมพลาสติกหรือทองแดงเสมอ
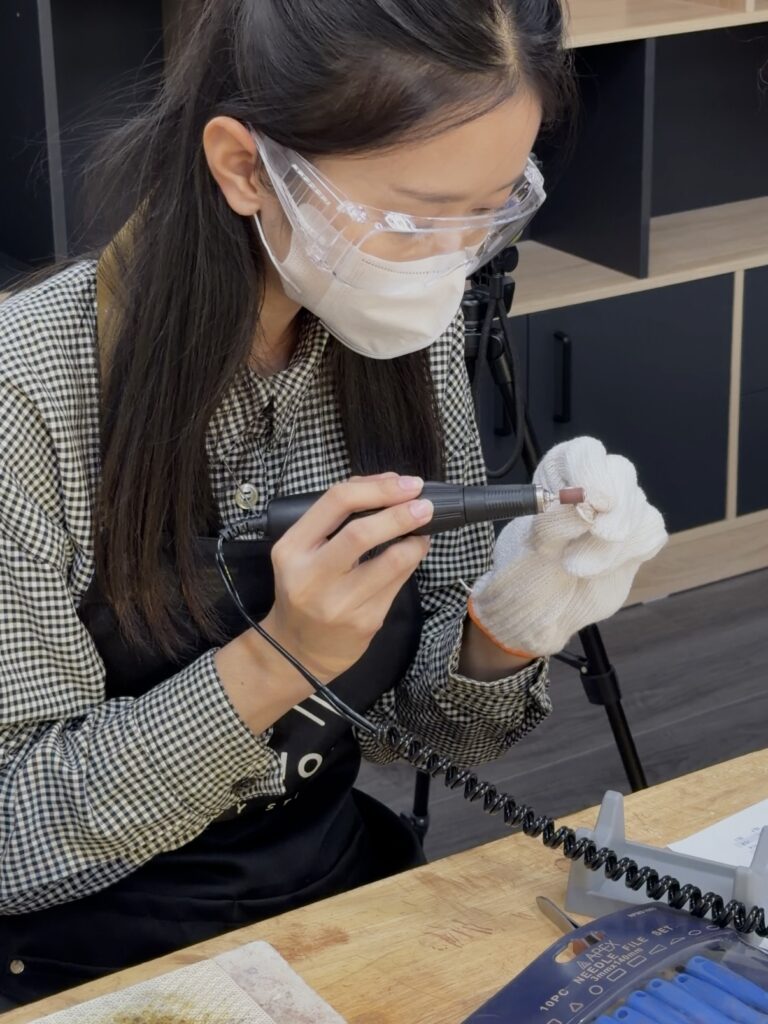
Step 5 — File and Refineขั้นตอนที่ 5 — ตะไบและปรับแต่ง
File the solder join flush with the band using a flat file. Then use a half-round file on the inside of the ring to smooth any roughness. Work progressively — start with a coarser file, finish with finer ones. Put the ring back on the mandrel and tap gently with a rawhide mallet to true the shape if needed. This step takes patience but makes all the difference.ตะไบรอยบัดกรีให้เรียบกับแถบด้วยตะไบแบน จากนั้นใช้ตะไบครึ่งวงกลมด้านในแหวนเพื่อขจัดความขรุขระ ทำงานแบบค่อยเป็นค่อยไป เริ่มจากตะไบหยาบ จบด้วยละเอียด ใส่แหวนกลับบนแมนเดรลและเคาะเบาๆ ด้วยค้อนหนังดิบเพื่อปรับรูปทรงถ้าจำเป็น ขั้นตอนนี้ต้องอาศัยความอดทนแต่สำคัญมาก
Step 6 — Add Texture (Optional)ขั้นตอนที่ 6 — เพิ่มลวดลาย (ถ้าต้องการ)
This is where you personalise the ring. Three easy options:นี่คือขั้นตอนที่คุณทำให้แหวนเป็นเอกลักษณ์ของตัวเอง สามตัวเลือกง่ายๆ:
- Hammeredลายค้อน — place the ring on a steel mandrel and tap with the round face of a hammer across the surfaceวางแหวนบนแมนเดรลเหล็กและเคาะด้วยหัวค้อนกลมทั่วพื้นผิว
- Matteผิวด้าน — work through 400–600 grit sandpaper in one consistent direction for an even brushed finishใช้กระดาษทรายเกรด 400–600 ในทิศทางเดียวสม่ำเสมอเพื่อผิวแบรชสวยงาม
- Mirror polishผิวเงา — skip texture and go straight to polishing papers (400 → 800 → 1200 grit), then a polishing clothข้ามลวดลายและไปขัดด้วยกระดาษขัด (400 → 800 → 1200 เกรด) แล้วตามด้วยผ้าขัด
Step 7 — Polish to Finishขั้นตอนที่ 7 — ขัดเงาขั้นสุดท้าย
Work through polishing papers from 400 up to 1200 grit, then finish with a silver polishing cloth or a polishing wheel for a mirror shine. Clean the ring with warm soapy water, dry it, and try it on. The ring you just made by hand is 925 sterling silver — it will last a lifetime with basic care.ขัดด้วยกระดาษขัดตั้งแต่เกรด 400 ขึ้นไปถึง 1200 แล้วจบด้วยผ้าขัดเงินหรือล้อขัดเพื่อเงาเหมือนกระจก ล้างแหวนด้วยน้ำอุ่นผสมสบู่ เช็ดให้แห้ง และลองสวม แหวนที่คุณเพิ่งทำด้วยมือเป็นเงิน 925 สเตอร์ลิง จะอยู่ได้ตลอดชีวิตถ้าดูแลอย่างถูกต้อง
Tips for First-Timersเคล็ดลับสำหรับมือใหม่
- The file is your best friend. Don’t rush the filing stage — this is where the ring goes from rough to refined.ตะไบคือเพื่อนที่ดีที่สุดของคุณ อย่ารีบในขั้นตอนตะไบ ตรงนี้แหละที่แหวนจะเปลี่ยนจากหยาบเป็นประณีต
- Solder flows toward heat. Heat the body of the ring evenly, and the solder will chase the heat to the join.บัดกรีไหลเข้าหาความร้อน อุ่นส่วนต่างๆ ของแหวนให้สม่ำเสมอ บัดกรีจะไหลตามความร้อนเข้าหารอยต่อ
- Keep everything clean. Grease from fingers can prevent solder from flowing. Use flux generously and handle the clean metal with tweezers after pickling.รักษาทุกอย่างให้สะอาด ไขมันจากนิ้วมือสามารถขัดขวางการไหลของบัดกรีได้ ใช้ฟลักซ์อย่างเพียงพอและจับโลหะที่สะอาดด้วยแหนบหลังพิเคิล
- Work slowly at first. Silver is forgiving — you can re-anneal, re-shape, and re-solder if something goes wrong.ทำงานช้าๆ ในตอนแรก เงินให้อภัยได้ คุณสามารถแอนนีล ขึ้นรูปใหม่ และบัดกรีใหม่ถ้ามีอะไรผิดพลาด
Want to Try It Without the Setup?อยากลองโดยไม่ต้องเตรียมอุปกรณ์?
Gathering all the tools and materials to make one ring at home costs more than a workshop session — and the learning curve without a guide is steep. If you want the full experience of making a real 925 sterling silver ring by hand without buying a studio’s worth of equipment, a guided workshop in Bangkok is the practical choice.การรวบรวมเครื่องมือและวัสดุทั้งหมดเพื่อทำแหวนวงเดียวที่บ้านมีค่าใช้จ่ายมากกว่าการเข้าร่วมเวิร์กช็อป และเส้นทางการเรียนรู้โดยไม่มีครูสอนนั้นชันมาก ถ้าคุณอยากสัมผัสประสบการณ์การทำแหวนเงิน 925 สเตอร์ลิงแท้ด้วยมือโดยไม่ต้องซื้ออุปกรณ์เต็มสตูดิโอ การเข้าเวิร์กช็อปแบบมีครูสอนเป็นตัวเลือกที่คุ้มค่า
Make a real silver ring in Bangkok.ทำแหวนเงินแท้ในกรุงเทพฯ
All tools, silver, and guidance included. 2 hours. No experience needed. You leave with a finished 925 sterling silver ring.รวมเครื่องมือ เงิน และการสอนทั้งหมด 2 ชั่วโมง ไม่ต้องมีประสบการณ์ คุณจะได้กลับบ้านพร้อมแหวนเงิน 925 สเตอร์ลิงสำเร็จรูป